Free glass cockpit trainer for the Garmin G1000Beta
Learn the G1000 on the ground, where it's free. Work through the PFD and MFD, the softkeys and the FMS knob, tuning the radios, building and flying a flight plan, loading approaches, the autopilot, and what to do when a display or sensor fails. Each lesson talks you through it a step at a time, with a Show me option if you get stuck. It runs in your browser with no sign-up, and it's best on a desktop or laptop. Read the guide →
Free play has the whole panel, the start positions, the installation options and the failures, with no lesson running.
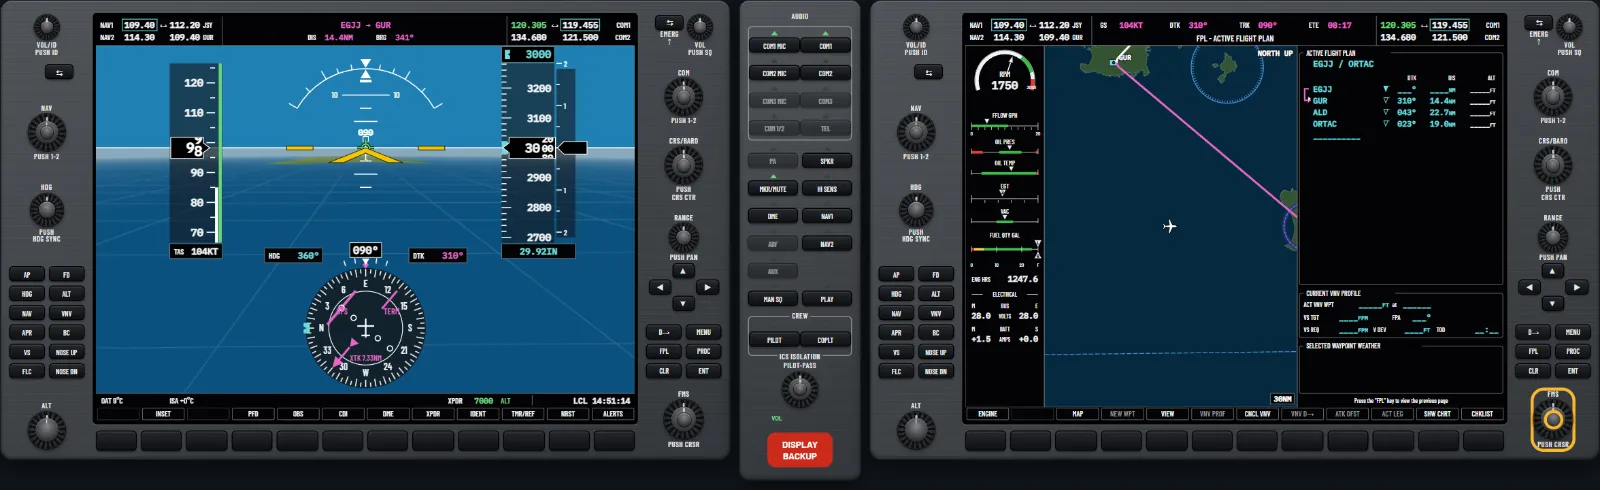
What you can practise
In the order of the pilot's guide, then whole tasks from start to finish. Each lesson sets the panel up, rings the control to use and moves on when the panel shows it done. Press Show me on any step to watch it done. No tests and no marks: open any lesson at any time.
Chapter 1
System overview
The controls, power-up, softkeys, menus, page groups and System Setup.
- Power up and find your way around the controlsSwitch the avionics on, watch the power-up tests, acknowledge the databases, then meet the softkeys and the FMS knob.
- Menus and the page groupsOpen a page menu, move through it and close it two ways, use it, then visit the MAP, WPT, AUX, FPL and NRST page groups.
- Softkeys and their levelsGo down the PFD softkey levels and back up with BACK, then use the Map level on the MFD and see how a key shows when it is on.
- The FMS knob and data entryTurn the cursor on with the FMS knob, move between fields, pick from a list, accept with ENT and cancel with CLR, on the System Setup page.
- The joystick: map range and pointerTurn the joystick to change the map range, push it for the map pointer, move the pointer around and push again to take it away.
- The GPS Status pageRead the sky view, accuracy, solution and signal bars on the GPS Status page, switch between the two receivers and look at the SBAS selection.
- System Setup: time and display unitsSet the time format and offset, the nav angle and the distance, altitude, temperature and position units on System Setup, then put the defaults back.
- System Setup: alerts and the voiceSet the airspace alert buffer and classes, the arrival alert and its distance, and the alert voice on System Setup.
- System Setup: page navigationMake the first click of the FMS knob change page group and keep the tabs up longer, try it, then put the defaults back.
- System Setup: the MFD data barChoose what the four fields across the top of the MFD show: change the fourth field to the en route safe altitude.
- System Setup: COM spacing and nearest airportsSet the COM channel spacing and the nearest-airport filters on System Setup, then put the defaults back with 8.33 spacing for Jersey.
- The System Status pageCheck every unit and database on the System Status page: choose the window to scroll with its softkey and play the annunciation test tone.
- The Utility page: the timersSet the generic timer on the Utility page to count down a minute, start, stop and reset it, then reset the flight timer from the page menu.
- The Utility page: departure and tripChoose whether the flight timer and departure time start at power-up or at lift-off, reset the departure time, and reset the trip statistics from the page menu.
- Display backlighting from the PFDOpen the PFD Setup Menu, switch the PFD and MFD display backlights to manual and dim the PFD a little, then set the key backlight by hand and close the menu.
Chapter 2
Flight instruments
The PFD, its settings, the timer and references, minimums and altitude alerting.
- Reading the PFDFind the attitude indicator, the airspeed and altitude tapes, the VSI and the HSI, then fly a little and watch the trend vectors move.
- Vspeed references on the airspeed tapeSet the glide speed for a light aircraft and flag it on the airspeed tape, then turn all the flags on and off and restore the defaults from the menu.
- The generic timer on the PFDStart the generic timer from the timer and references window, watch it count, then stop it and reset it to zero.
- The altimeter setting in hectopascalsShow the altimeter setting in hectopascals and the altitude in metres, set the QNH with the BARO knob, then select standard pressure.
- Selected altitude and altitude alertingSee the altitude alerter catch a drift off the selected altitude, then set a new one with the ALT knob and climb towards it, watching the box at each stage.
- The baro transition alertSwitch on the baro transition alert in System Setup and set the Channel Islands transition altitude, 5000 feet, so the setting flashes when you forget it.
- The HSI and the heading bugSwitch the HSI between the full compass rose and the arc, then move the heading bug with the HDG knob and sync it to your heading.
- The CDI source and the courseStep the CDI from GPS to VOR1 and VOR2 with the CDI softkey, set a course with the CRS knob and centre the needle with a push.
- Bearing pointers and the DME windowAdd bearing pointer one and two to the HSI, step through their sources, and show the DME information window.
- Wind data and the PFD defaultsShow the wind beside the HSI in each of its three options, then put the PFD back to its defaults with the DFLTS softkey.
- The inset map on the PFDShow the inset map at the lower left of the PFD, declutter it, change its range with the PFD joystick, add terrain and turn it off.
- The ALERTS softkey and windowA new message flashes on the ALERTS softkey: acknowledge it, read it in the Alerts window, then close the window.
- Setting the minimumsSet the ILS 08 decision altitude at Jersey as barometric minimums in the timer and references window, so the PFD shows the minimums box and calls them out.
- GPS integrity: LOI and INTEG OKFlying a plan to Jersey, lose the GPS in the terminal area: see LOI on the HSI and read the alerts, then bring it back and see INTEG OK.
Chapter 3
Engine indication
The engine display, leaning and fuel.
- The engine strip and its coloursRead the Cessna 172S engine strip down the left of the MFD: the tachometer, fuel flow, oil, EGT, vacuum, fuel quantity, hours and electrics.
- The Lean Display and lean assistOpen the Lean Display, step the selected cylinder with CYL SLCT, then turn lean assist on and off to find the first cylinder to peak.
- The System Display and fuel remainingOpen the System Display, reset the fuel totaliser after refuelling, and set the fuel remaining to the 35 gallon tabs with GAL REM.
Chapter 4
Audio panel and radios
Audio checks, COM and NAV tuning, 121.500, the transponder and DME.
- Audio panel preflightThe audio panel check before every flight: isolation off, squelch open, intercom and radio volumes set, then the squelch back to automatic.
- Choose what you transmit and hearUse the microphone keys to pick the radio you transmit on, add a second receiver, and select the NAV audio and the cabin speaker.
- Marker beacons and intercom isolationSelect and mute the marker beacon tones, set the marker sensitivity, and isolate the pilot and copilot from the passengers on the intercom.
- Tune the COM radiosTune Jersey Tower with the COM knob, swap it to active, move the tuning box to COM 2, and set the volume and squelch.
- Tune 121.500 in two secondsHold the COM transfer key to put the emergency frequency in the active field without turning a knob, then transmit on it.
- Tune a frequency from the databaseLoad Jersey Tower from the PFD's Nearest Airports window, and Jersey Ground from the Airport Information page, without turning the COM knobs.
- Tune a NAV radio and check the identTune the Dinard VOR on NAV 1, make it active, select it on the CDI, and listen to its Morse identifier before you use it.
- Tune a VOR from the Nearest VOR pagePick the Dinard VOR on the Nearest VOR page, load its frequency into the NAV standby with the FREQ softkey and ENT, and make it active.
- Load NAV frequencies from the MFD pagesLoad the Dinard VOR from its VOR Information page, then Jersey's ILS frequency from the Nearest Airports page with the page menu.
- Set a squawk, select altitude, identOn runway 26 at Jersey: key in the code ATC gives you with the softkeys, select altitude mode, and ident when asked.
- Transponder modes, backspace and timeoutsOn the ground at Jersey: select standby, on and ground mode, take back a wrong digit with backspace, and let an unfinished code lapse.
- FMS knob codes, the VFR key, emergenciesOver St Joseph, set a code with the FMS knob, squawk VFR with the VFR softkey, and learn which codes are kept for emergencies.
- Pair the DME with a NAV radioShow the DME window, pair the DME with NAV 1, NAV 2 or HOLD in the DME Tuning window, and hear its identifier on the audio panel.
Chapter 5
Flight management
The map, waypoints, nearest, direct-to, flight plans, procedures, VNV, trip planning and RAIM.
- Map range and orientationZoom the Navigation Map in and out with the joystick, then turn it track up in Map Setup and back to north up.
- Declutter, topography and the inset mapStep the map through its declutter levels, turn the topography off and on, then use the small map on the PFD and declutter it.
- Pan the map, look things up and measureUse the map pointer to find Jersey airport and open its page, then measure a bearing and distance from the aircraft.
- Map Setup: track vector and range ringTurn on the track vector with a two minute look-ahead and the navigation range ring, and see what the fuel range ring shows.
- Map Setup: land, wind, topography, fuelUse the Map group of Map Setup: land data, the wind vector, the topography range and scale, the fuel range ring with its reserve, and the altitude arc.
- Map Setup: auto zoomTurn on auto zoom for both displays in Map Setup, and see how the look-forward times and the time-out control the range it picks.
- Map Setup: text sizes and symbol rangesUse the Aviation and Land groups of Map Setup to make intersection names larger, show them further out, and turn on the latitude and longitude grid.
- The Airport Information pageOn the ground at Jersey: read the airport, runway and frequency boxes, look at the airport directory, and move the cursor to the runway.
- Look up a VOR, an intersection and an NDBSpell an identifier on the VOR and intersection pages and let the search finish it, then look at the nearest NDB.
- Make a user waypoint on the mapPut the map pointer just off St Ouen's Bay, review the airspace there, and make a user waypoint called BAY at that spot.
- User waypoint by radial and distanceMake a user waypoint with NEW, place it from the Jersey VOR, refresh its comment, move it to present position and set the default storage.
- Edit, rename and delete a user waypointChange the user waypoint BAY to a latitude and longitude waypoint and move it ten minutes north, then rename it BAY2 and delete it.
- The nearest pagesFind the nearest airport from the PFD and the MFD, its runway and frequencies, then the nearest intersections and VORs.
- Nearest frequencies and nearest airspacesLoad the Jersey ATIS from the Nearest Frequencies page, then see the airspace you are in on the Nearest Airspaces page and load its tower frequency.
- Go direct to a waypointPress the Direct-to key, spell GUR for the Guernsey VOR, activate it, then re-select direct from the PFD to refresh the course.
- Direct-to from a page, the map or nearestGo direct to the waypoint a page shows, to a point picked on the map, and to the nearest airport from the PFD in a hurry.
- Direct-to from the nearest and user listsOpen the Direct-to window's waypoint lists, step through the flight plan, nearest, recent and user tabs, then go direct to the user waypoint BAY.
- Direct-to a plan waypoint, and cancel itWith a flight plan running, go direct to a later waypoint from the waypoint list, cancel it to rejoin the plan, then use the flight plan page.
- Create a flight planBuild an active flight plan on the MFD: open the flight plan page, turn the cursor on and enter Jersey, Guernsey VOR and ORTAC.
- Insert and remove waypointsEdit the active plan: put the Alderney beacon in front of ORTAC with the cursor, then take it out again with CLR.
- Store a plan and use the catalogueStore the active plan, find it in the flight plan catalogue, read its departure, destination and distance, then make a new blank plan there.
- Activate and invert a stored planActivate a stored plan from the catalogue, then fly it backwards with INVERT, and invert the active plan from its page menu.
- Import and export flight plansExport a stored plan to the data card in the MFD's top slot, then import it back into an empty place in the catalogue.
- Edit a stored plan and load its proceduresOpen a stored plan with EDIT, add Alderney to it, and load the ORTAC 3A departure, the ORTAC 1K arrival and the ILS 08 with LD DP, LD STAR and LD APR.
- Copy, delete and rename flight plansOn the ground at Jersey: copy and delete a stored plan, empty the catalogue, give the active plan a comment, and delete it.
- The active leg and the plan viewsSkip ahead with ACT LEG to make a later leg active, then change the flight plan page to the wide view and cumulative distances.
- Along-track offsets and parallel trackMake a waypoint 5 miles before Alderney with ATK OFST, then fly the plan 3 miles right of track with parallel track, and cancel it.
- Holds and the closest point of the planPut a hold at Alderney into the plan, hold at present position, take both out, then find the closest point of the plan to the Jersey VOR.
- Vertical navigation: the descent profileUse the VNV profile to the RNP 08: turn VNV off and on, change the descent angle, start a vertical direct-to and watch for the top of descent.
- Enter and remove altitude constraintsGive Alderney an altitude in the flight plan for vertical navigation, see how it is drawn, then remove it again with CLR.
- Designate, edit and revert plan altitudesWith the RNP 08 loaded, make a published altitude reference only and designated again, edit a worked-out altitude, and revert to the published one.
- Direct-to with a VNV altitude and offsetCleared direct SHARK to cross 3 miles before it at 2000 ft: enter the altitude and the offset in the Direct-to window and fly the vertical profile.
- Direct-to on a set courseGo direct to the Jersey VOR on a course you choose: enter JSY in the Direct-to window, set the course to 080, and activate it.
- Look through an airport's proceduresFrom the Airport Information page, show the destination, then preview Jersey's approaches, departures and arrivals on the map before loading any.
- Load a departureOn runway 26 at Jersey, load the ORTAC 3A departure with the PROC key, see it in the plan, then remove it from the page menu.
- Load an arrivalComing back to Jersey from the north, load the ORTAC 1K arrival for runway 08, then remove it with the cursor and CLR.
- Load and activate an approachWest of Jersey, load the ILS 08 with the JW transition and the minimums, then activate it to go direct to the beacon.
- Load an approach from the nearest pagePick Jersey's RNAV GPS 08 LPV on the Nearest Airports page, load it with LD APR, and activate it from the loading page in one go.
- Vectors to final and the missed approachWith the ILS 08 loaded, activate vectors to final, then the missed approach, and finally remove the approach from the plan.
- Approach channel and cold temperaturesSelect the RNP 26 at Jersey by its channel number, load and activate it, then turn temperature compensation on for a cold day and off again.
- Trip planningOn the Trip Planning page, read the trip and fuel figures for the rest of the plan and for one leg, then try the waypoint and manual modes.
- Trip planning by waypoints and by handOn the Trip Planning page, get the figures from the Guernsey VOR to Alderney in waypoint mode, then type in your own fuel flow in manual mode.
- RAIM predictionOn the GPS Status page, predict whether RAIM will be available at the present position, step by step as the manual gives it.
- RAIM at a waypoint, and SBAS on and offPredict RAIM at Jersey for your arrival time, then turn the EGNOS augmentation off and on again on the GPS Status page.
- CDI scaling, OBS and SUSPSee how the flight phase sets the GPS CDI scale, choose a fixed scale in System Setup, and use OBS mode to set your own course to a waypoint.
- Example flight: before departureThe manual's example flight at Jersey, part one: on runway 26, load the ORTAC 3A departure and the ORTAC 1K arrival for a round trip.
- Example flight: the arrivalThe example flight, part two: back on the ORTAC 1K arrival, load the RNP 08 by GIPTA, check its altitudes and activate it direct to the IAF.
- Example flight: approach and missedThe example flight, part three: fly the RNP 08 to the LPV decision altitude, go around, and resume sequencing with SUSP into the missed approach.
Chapter 6
Hazard avoidance
Terrain and TAWS.
- Terrain colours on the mapsWest of Exeter toward Dartmoor: turn terrain on for the Navigation Map and the PFD inset map, and read the red, yellow and black.
- Terrain and obstacle data in Map SetupOn the apron at Jersey, turn terrain and obstacle data on in Map Setup, then see the obstacles leave the map when its range is beyond their setting.
- An obstacle under the map pointerOn the apron at Jersey, put the map pointer on the TV mast north-east of the airport and read its height, distance and bearing from the map.
- The TAWS-B pageOpen the TAWS-B page in the Map group, change between the 360 and arc views, set its range and show airports and navaids over the terrain.
- The profile viewOver Devon, open the profile view under the Navigation Map: the terrain ahead along your track, seen from the side, against your altitude.
- The profile path on the mapWith the profile view on, find the white profile path on the Navigation Map, then turn it off in the Profile group of Map Setup.
- The Terrain-SVS page and its inhibitWith Terrain-SVS fitted in place of TAWS-B, open its page in the Map group, inhibit its alerts with INHIBIT, see TER INH, and enable them again.
- A terrain caution, and what to doFly low toward Dartmoor until TAWS-B gives a terrain caution, go to the TAWS-B page from the pop-up, then climb away until it clears.
- A PULL UP warningLow over Devon the first alert is a red PULL UP warning. Autopilot off, full power, wings level and the best angle climb until it stops.
- An obstacle alertLow over Jersey toward the TV mast: TAWS-B gives an obstacle caution. Climb away until it clears, and keep to the minimum altitudes on the chart.
- Too low on final, and the 500 callOn final for runway 08 at Jersey, hear the five hundred call, then go below the normal approach path and get the TOO LOW, TERRAIN caution.
- Excessive descent rate: SINK RATELow over the sea west of Jersey, dive steeply with the power off until TAWS-B calls SINK RATE, then level the wings, add power and pull out.
- Losing height after take-off: DON'T SINKJust after take-off from runway 26 at Jersey, let the aircraft sink and hear DON'T SINK, then climb away at full power.
- Inhibit TAWS and enable it againInhibit the TAWS-B forward looking and premature descent alerts with the INHIBIT softkey, see TAWS INH, then enable them again from the page menu.
- LOW ALT on a GPS approachOn the RNP 08 at Jersey with TAWS inhibited, sink below the final approach fix altitude and see LOW ALT by the altimeter, then climb back and enable TAWS.
- Test the TAWS systemOn the ground at Jersey, run the TAWS-B test from the TAWS-B page menu and see TAWS TEST until the voice reports the test passed.
- Terrain Proximity, Terrain-SVS and TAWS-BThe three terrain systems compared: with Terrain Proximity fitted nothing warns you near Dartmoor; refit TAWS-B on the Installation panel and the caution comes.
- When TAWS is not availableSee the TAWS N/A and TAWS FAIL annunciations: the GPS fails in flight, then give the terrain system a fault on the Installation panel.
Chapter 7
Autopilot
The modes, and the manual's example procedures at Jersey.
- Engage and disconnect the autopilotEngage the autopilot with the AP key, read the status box, and disconnect it with AP DISC and with the AP key, as you would in the aircraft.
- The electric trim switch and its checksUse both halves of the electric trim switch and MET ARM to disconnect the autopilot, then see a half held on its own disable the switch with PTRM.
- The flight directorTurn the flight director on with FD, change its pitch with NOSE UP, turn it off, and see that the FD key does nothing while the autopilot is engaged.
- Pitch hold and roll holdWith the autopilot in PIT and ROL, raise the nose half a degree at a time to climb, then level again; and learn how roll hold treats a bank.
- Control wheel steeringHold CWS to fly by hand with the autopilot engaged: climb in altitude hold and let go for a new altitude, then set a bank for roll hold.
- Heading selectSync the heading bug, select HDG, and turn the autopilot 30 degrees with the HDG knob; then press HDG again to go back to roll hold.
- VOR approach modeWest of Jersey on the VOR/DME 08: tune the Jersey VOR, set the 083 final course and press APR, so the autopilot captures in VOR approach mode.
- Backcourse modeEast of Jersey, an exercise on the back beam of the runway 08 localizer: set the front course, press BC, and let the autopilot track it westbound.
- Altitude hold and vertical speedFrom altitude hold, set 4000 ft with the ALT knob, climb in VS at 500 ft a minute, and watch the selected altitude capture: ALTS, then ALT.
- Example: the departureThe manual's departure at Jersey: climb out of runway 26 in VS at 700 ft a minute, engage the autopilot, turn on a heading and level at 3000 ft.
- Example: intercept a VOR radialThe manual's VOR intercept at Jersey: on a heading, put the VOR on the CDI, set the 090 course to JSY and arm NAV; the autopilot turns on.
- Example: fly a GPS flight planThe manual's change from VOR to GPS: switch the CDI to GPS, see NAV drop to roll hold, press NAV again and let the autopilot turn at JSY onto the next leg.
- Example: a descent in FLCThe manual's FLC descent at Jersey: set 2000 ft, press FLC to hold the airspeed, reduce power, and level off at the selected altitude.
- Example: a descent on the VNV pathThe manual's VNV descent at Jersey: arm VPTH, set the selected altitude below the target, and let the autopilot descend on the path to 2000 ft at LAPLI.
- Example: an FLC descent with the path armedThe manual's non-path descent at Jersey: with the VNV path armed, descend early in FLC to 2500 ft, then let the path take you on down to 2000 ft at LAPLI.
- Example: the ILS approachThe manual's ILS on the autopilot, flown on the ILS 08 at Jersey: from vectors in HDG, arm the approach and watch the localizer and glideslope capture.
- Example: the LPV approachThe manual's LPV approach on the autopilot, flown on the RNP 08 at Jersey: APR arms the glidepath, and the autopilot captures it at the final approach fix.
- Example: the go-aroundThe manual's go-around on the ILS 08 at Jersey: GA at the decision altitude, hand-fly the climb, then the autopilot in NAV and FLC up to 3000 ft.
- Autopilot annunciations and alertsRead the autopilot's status box and alert field: an elevator mistrim and what it means when the autopilot lets go, then the MAXSPD overspeed warning.
Chapter 8
Additional features
Synthetic vision, airport diagrams, charts, the scheduler, checklists and data logging.
- Synthetic vision on the PFDApproaching Jersey: turn synthetic terrain off and on, then the pathway boxes and the horizon headings, and see the airport sign ahead.
- The PFD's field of view on the mapTurn on FIELD OF VIEW in Map Setup, so the Navigation Map shows the two dashed lines of what synthetic vision can see ahead.
- Airport diagrams on the mapOn runway 26 at Jersey, zoom the Navigation Map in until the airport diagram appears, read the taxiways and hot spots, and use the declutter levels.
- Charts on the MFDWith the ILS 08 at Jersey loaded, show the chart, open the approach chart, look at its plan view and minimums, scale it, then go back to the map.
- Charts from the menu: info, DP and STAROpen Jersey's charts from the page menu, choose the parking chart in the INFO box, then look at the departure and arrival charts with DP and STAR.
- Choose an approach chart and its viewsPick the RNP 08 from Jersey's approach charts in the APPROACH box, then look at its header and profile views and fit it to the width.
- The other chart viewer, and the directoryFit the second chart viewer on the Installation panel and see what it does differently, then open the airport directory with INFO-2.
- Charts by day and by nightOpen the Chart Setup window from the chart's page menu and change the colour scheme from day to night, then see it take effect when the page changes.
- Set a reminder with the schedulerOn the Utility page, enter a one minute OIL reminder in the scheduler, then read it in the Alerts window when the ADVISORY softkey flashes.
- A periodic reminder, and deleting oneOn the Utility page, make the FUEL reminder periodic every 30 minutes, then delete it with CLR and ENT.
- Electronic checklistsOpen the checklists with CHKLIST, check items with ENT and the CHECK softkey, take a check off, open the emergency checklists and come back.
- Choose a checklist, and go to the nextChoose a group and a checklist with the FMS knob, check a list through to Checklist Finished, go on to the next, and pick an emergency checklist.
- Flight data loggingSee the flight data logger on the Utility page, take the data card out on the Installation panel, read the message, and put the card back.
Chapter 9
When things fail
Reversionary mode, AHRS and air data loss, GPS loss, communication failures and the alerts.
- A display fails: reversionary modeThe PFD fails in flight: fly on the MFD in reversionary mode until it comes back, then select reversionary mode yourself with DISPLAY BACKUP.
- Losing heading, then attitudeThe magnetometer fails, CHECK ATTITUDE shows, then the AHRS fails: recognise the red crosses, take over from the autopilot and fly the standby instruments.
- Losing the air dataThe air data computer fails: fly on the standby airspeed indicator and altimeter, then see why losing the GPS as well takes the attitude away.
- GPS loss and dead reckoningLose the GPS en route west of Jersey: recognise dead reckoning, read GPS NAV LOST, cross-check with the VOR, then see normal navigation come back.
- Unusual attitudesA steep bank, the nose high and the nose low: see the PFD clear itself, read the red chevrons, and learn the standard recovery for each.
- A radio fails, and a stuck microphoneA COM 1 tuning failure loads 121.500 by itself: carry on with COM 2. Then a stuck microphone key: recognise it and free it with the push-to-talk switch.
- Autopilot failuresWith the autopilot flying, the pitch trim, the roll axis and then the whole system fail: read the red AFCS status box and take control by hand.
- Aircraft alerts and the Alerts windowA caution and a warning from the aircraft: see the annunciation window and the softkey colours, acknowledge each, open the Alerts window and tidy it up.
- The system messages, group by groupOne failure from each main group: a database, a GPS receiver, an avionics unit, the terrain data, the displays and the transponder. Read each message.
Drills
Task drills
Whole tasks from start to finish, built from the manual's example procedures.
- Find your way aroundA quick tour: the nearest airports, airport information, system status, the flight plan, then back to the map and the PFD windows.
- After start: power-up to readyParked at Jersey after engine start: power up, acknowledge the databases, identify the VOR, set the tower, QNH and minimums, and set the heading bug.
- Load a plan and go directWest of Jersey: activate a stored flight plan to Jersey via Guernsey from the catalog, then take a clearance direct to Jersey.
- Fly it on the autopilotWith a plan to Jersey active, engage the autopilot, fly a heading, climb to 4000 feet in flight level change, couple to the plan and disconnect.
- Brief and fly the ILS 08 at JerseyOn final for runway 08 at Jersey with the ILS loaded: set the minimums, activate vectors to final, couple the autopilot and let it capture.
- When things failRespond to failures as they happen: the PFD fails and the MFD takes over, then manual reversion, then a loss of attitude.
Inside the trainer
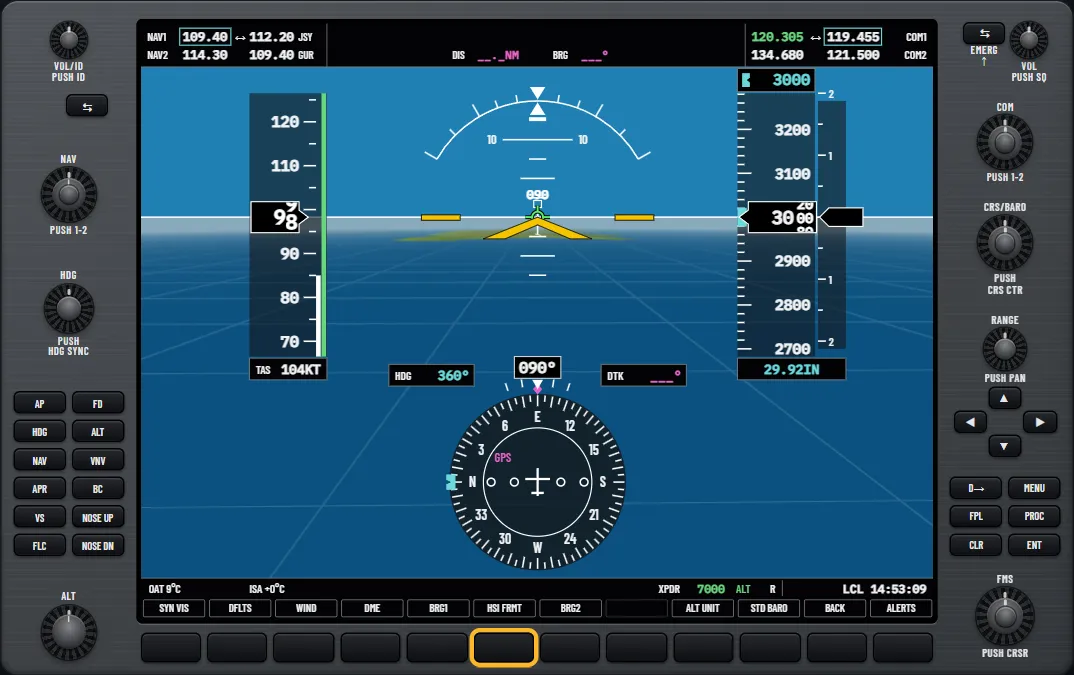
The PFD with its softkeys and HSI 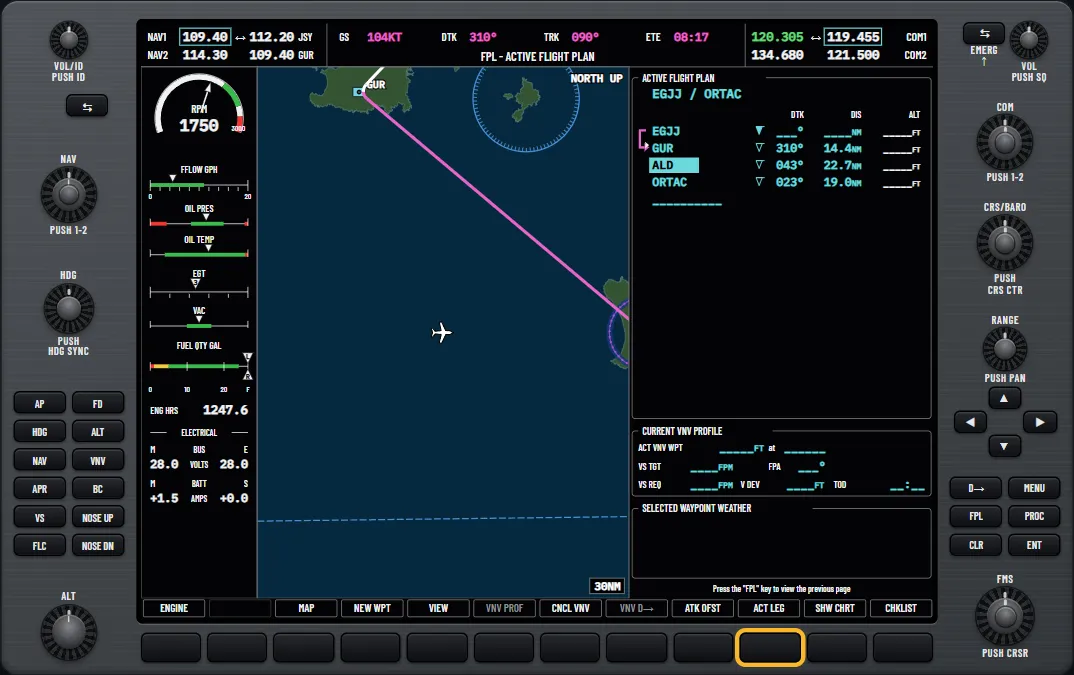
A flight plan on the MFD map 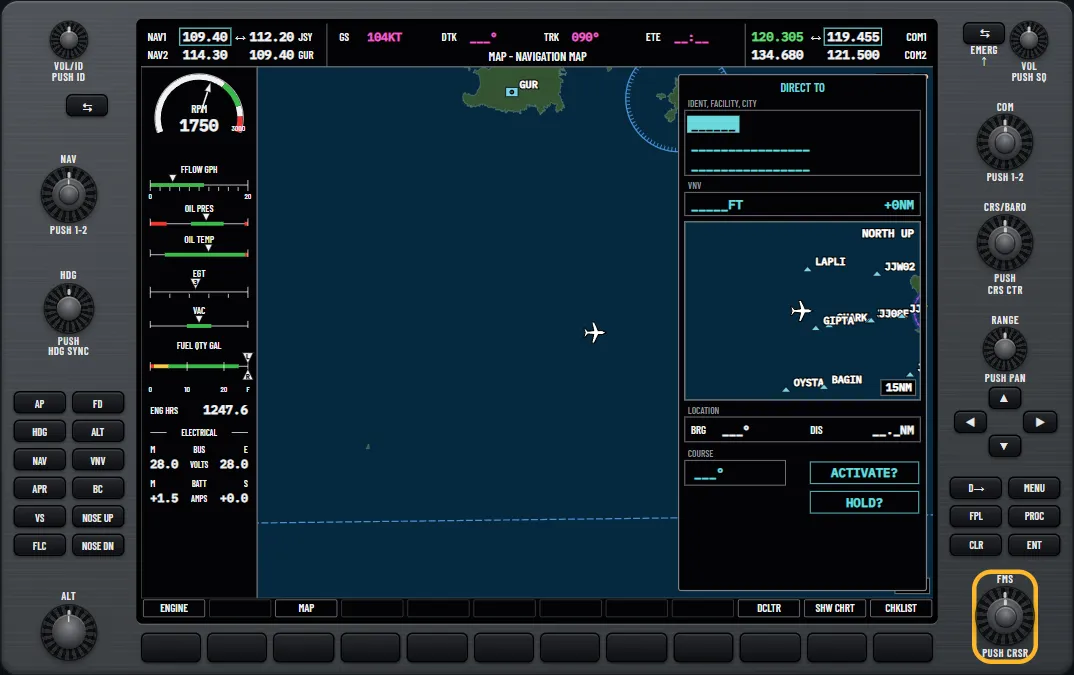
The Direct-to window 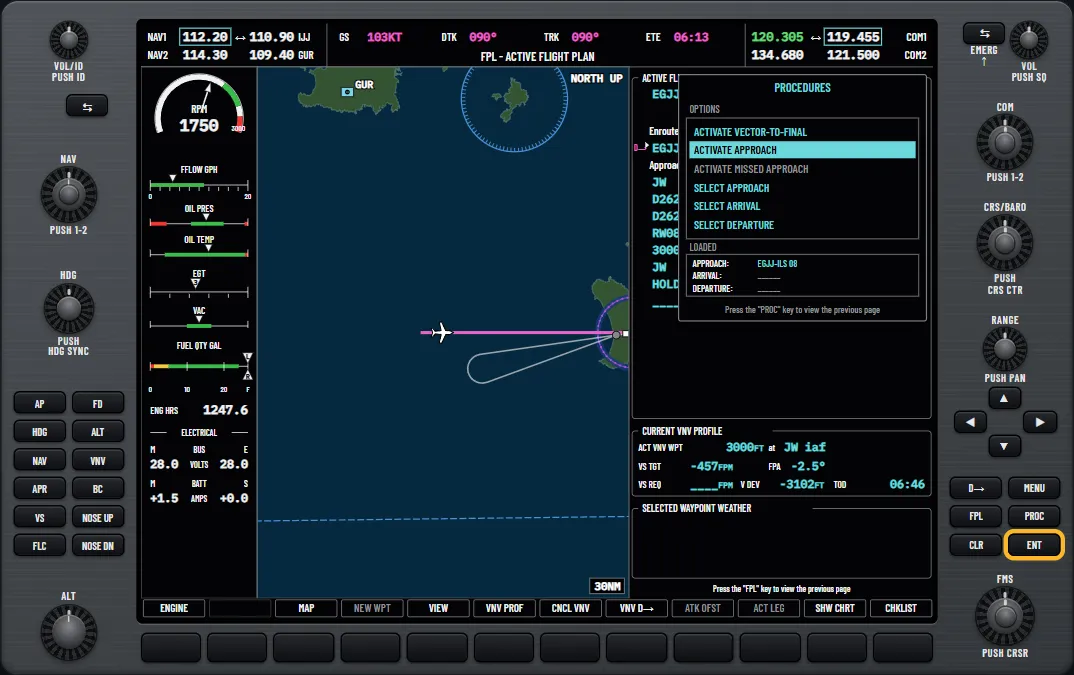
Activating a loaded approach 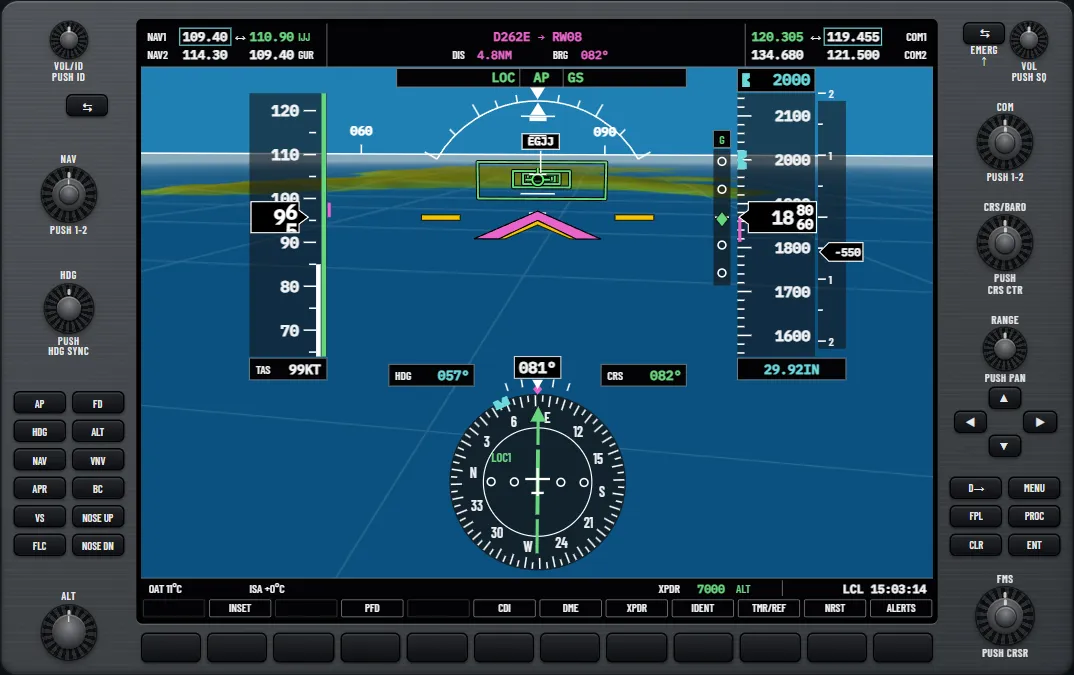
The autopilot's mode strip on a coupled ILS 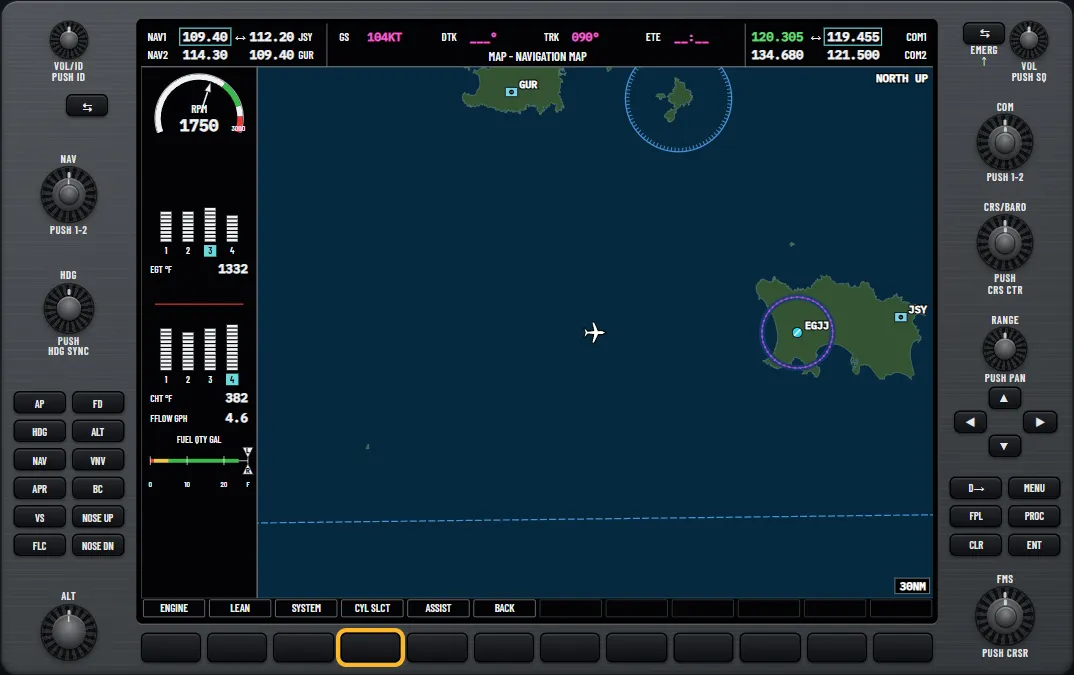
The Lean Display in the engine strip
Who it's for
- Pilots moving from round dials to glass.
- Instrument rating students practising approaches.
- Renters and owners getting current on a G1000 aircraft.
- Instructors who want an on-screen teaching aid.
Why practise on the ground
Avionics practice is expensive in the aircraft, because the engine is running while you look for the right page. Learn the button presses here, and your airborne time can go on flying.
Free play and drills
Free play gives you the whole panel with no lesson running: choose a start position, the installation options and the failures. The drills at the end of the syllabus join the lessons up into whole tasks, from finding your way around to briefing and flying an approach.
Read the guides
Questions pilots ask
- Is this G1000 trainer free?
- Yes. Every lesson and free play are free, with no sign-up.
- Do I need to install anything?
- No. It runs in your browser. Your progress is saved in that browser, so you can leave and pick up where you stopped without an account.
- Does it work on a phone or tablet?
- It's best on a desktop or laptop. On a phone the panel shows one display at a time, which is fine for a quick look but cramped for a full lesson.
- Which G1000 does it follow?
- The classic G1000 as fitted to the Cessna 172S, following the published pilot's guide for that installation. It isn't the G1000 NXi, and other aircraft and software versions differ, so your own aircraft's documents always come first.
- Can I practise approaches?
- Yes. There are ILS, LPV and VOR approach lessons, as well as lessons on loading and activating approaches, vectors to final and the missed approach.
- Does it cover the autopilot?
- Yes: heading, VOR approach and backcourse modes, altitude hold, vertical speed, FLC, VNV path descents, the flight director and go-arounds.
- Can I practise failures?
- Yes: reversionary mode, losing heading, attitude or air data, GPS loss, and radio and autopilot failures.
- Is it a substitute for training?
- No. It's for learning the buttons and the workflow before and between lessons. Flying the aircraft still needs your instructor and the approved documents.
Unofficial training aid. Not affiliated with or endorsed by Garmin. Not for flight: always follow the approved pilot's guide and your instructor. Garmin and G1000 are trademarks of Garmin Ltd. or its subsidiaries.