See it for yourself
Free and interactive, in your browser. No sign-up, nothing to install.
Loading and activating the approach
- Press PROC, highlight SELECT APPROACH and press ENT.
- Choose the airport, then the approach, pressing ENT after each.
- Choose a transition and press ENT: an initial approach fix, or VECTORS.
- Set the minimums, or press ENT to skip them.
- With LOAD? highlighted, press ENT. To load and activate in one go, turn the large FMS knob to ACTIVATE first.
Load adds the approach to the end of your plan and you carry on flying the plan. Activate gives guidance to the first approach waypoint straight away. So load early, en route. When you are ready, press PROC and then ENT: with an approach loaded, the window opens on ACTIVATE APPROACH.
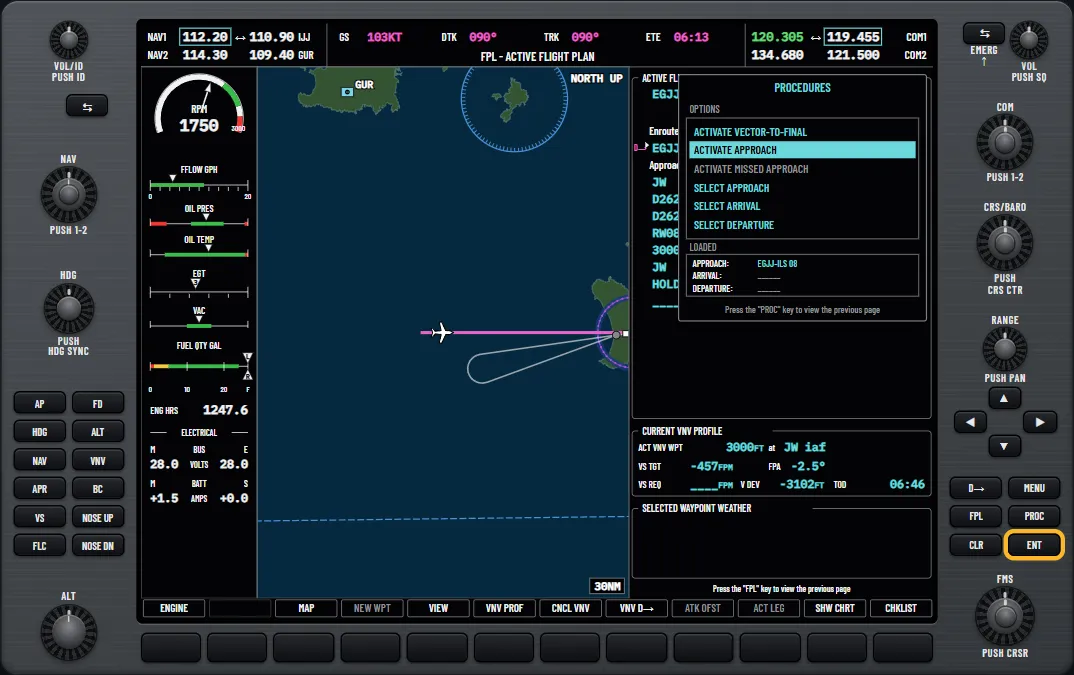
If ATC are giving you headings, choose ACTIVATE VECTOR-TO-FINAL instead. It makes the inbound course to the final approach fix (FAF) the active leg.
The message NOT APPROVED FOR GPS is normal on an ILS. The GPS can take you to the approach, but you must fly the final course on a NAV receiver.
Try it: “Load and activate an approach”: the ILS 08 at Jersey with the JW transition
Try it: “Vectors to final and the missed approach”: activate each, then remove the approach
Tuning and identing the localiser
Loading an ILS tunes the frequency for you. Where it lands depends on the CDI source:
- GPS on the CDI: NAV1 active, with the old active frequency moving to standby.
- NAV1 or NAV2 on the CDI: that radio’s standby field, so press the NAV frequency transfer key to use it.
You still need to identify it. Select the NAV1 key on the audio panel, then push the NAV volume knob. A white ID appears beside the active frequency and you hear the Morse. Check it against the chart, then push again to turn it off.
Try it: “Tune a NAV radio and check the ident”: the same controls, on the Dinard VOR
Switching the CDI source
The CDI (course deviation indicator) can move from GPS to the localiser by itself, but only in two situations.
When it switches by itself
Activating vectors to final on an ILS switches it. GPS steering then stops, so you fly headings until the localiser captures.
Flying the approach from the plan on GPS switches it when all of these are true. GPS steering then carries on until the localiser captures, up to the FAF.
- An ILS or localiser approach is loaded in the active flight plan.
- The FAF is the active leg, less than 15 NM away, and you are moving towards it.
- A valid localiser frequency is tuned.
- GPS deviation on the CDI is less than 1.2 times full scale.
When you switch it yourself
Otherwise, expect it to stay on GPS. The CDI softkey steps through GPS, VOR1/LOC1 and VOR2/LOC2. Pressing it while NAV or approach mode is active drops the autopilot to ROL, wings level, so choose the source first.
How to confirm it
On the localiser, the HSI shows LOC1 or LOC2 in green, a green course pointer and a green CRS box in place of the magenta DTK box. Check that box shows the inbound course, and set it with the CRS knob if not. With an ILS frequency active and your heading within 107° of the selected course, a green glideslope diamond appears beside the altitude tape. An RNAV approach is different: see the RNAV (LPV) guide.
Try it: “The CDI source and the course”: step through the sources and set a course
Setting minimums
Set them while loading the approach, or at any time with the TMR/REF softkey: turn the large FMS knob to MINIMUMS and the small knob to BARO, press ENT, enter the altitude and press ENT. The setting resets on a power cycle.
BARO minimums work against your altimeter, so enter the DA from the chart and set QNH with the BARO knob. The trainer’s screens show inches by default. To use hectopascals, press the PFD softkey, then ALT UNIT, then HPA.
- Within 2500 ft: the BARO MIN box and its tape bug appear in light blue.
- Within 100 ft: both turn white.
- At minimums: both turn yellow and you hear the minimums call.
Try it: “Setting the minimums”: the ILS 08 decision altitude at Jersey
Flying it coupled
The status box across the top of the PFD shows armed modes in white and active modes in green. Our autopilot modes guide has the rest. From vectors:
- Fly ATC’s headings in HDG mode, using the HDG knob.
- When cleared, press APR. LOC and GS appear in white beside the green HDG. The autopilot chooses when to start the turn in.
- LOC turns green and flashes, and the autopilot turns onto the final course.
- GS turns green at the glideslope and the descent starts. You still fly the power: the drill reduces it to hold about 90 knots.
- At the DA, press AP DISC and land, or go around. The lessons follow the 172S handbook and disconnect by 200 ft above the ground at the latest. The ILS guide covers the visual references.
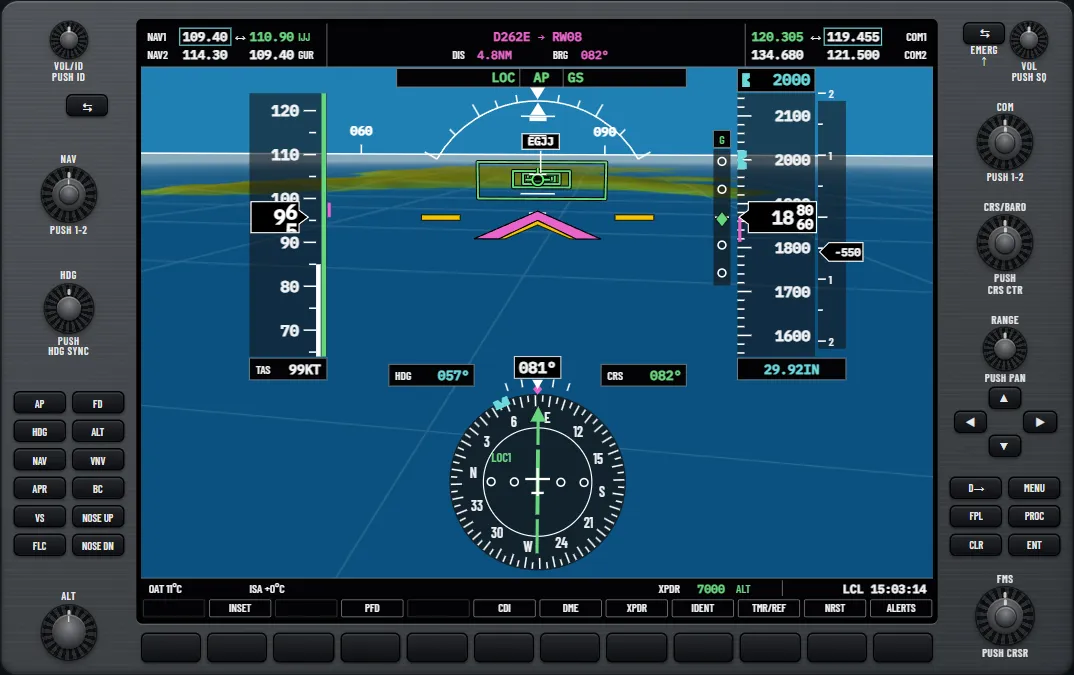
From the plan in GPS NAV, you can press APR before the CDI has switched: LOC arms, and GPS keeps steering until the localiser captures. Three traps:
- Staying in GPS NAV without APR, the wings roll level at the FAF after the switch.
- Activating vectors to final with approach mode active also reverts to ROL.
- LOC will not capture with your heading more than 105° off the localiser course.
Try it: “Example: the ILS approach”: arm from vectors and watch both captures
Try it: “Brief and fly the ILS 08 at Jersey”: minimums, vectors to final, then couple it
The go-around
Press the GA switch, on the panel above the throttle in the 172S, and add full power yourself. The switch does several things at once:
- The autopilot disconnects, with AP flashing yellow and an aural alert.
- GA shows in both mode fields and ALTS is armed.
- The flight director’s command bars show wings level and 7° nose up.
- With an approach loaded, the missed approach becomes active.
- On an ILS, the CDI goes back to GPS.
Then rebuild the automation in order:
- Hand-fly the climb on the command bars. From the 172S handbook, the lesson waits for a steady climb at 800 ft above the ground before re-engaging. Check the supplement for your aircraft.
- Press AP, then NAV, to follow the missed approach on GPS.
- Check the selected altitude and press FLC to hold your climb speed.
- ALTS then ALT capture the altitude. ALT holds height and not speed, so set power.
Practise it all for free on the glass cockpit trainer for the G1000.
Try it: “Example: the go-around”: GA at the decision altitude, then NAV and FLC up to 3000 ft
Questions pilots ask
- Does the G1000 tune the localiser when you load an ILS?
- Yes. With GPS on the CDI the frequency goes to NAV1 active, and with a NAV radio on the CDI it goes to that radio’s standby field. You still identify it yourself.
- Does the G1000 switch the CDI to the localiser automatically?
- Only with an ILS or localiser approach in the active plan, and then in two cases: when you activate vectors to final, or when the final approach fix is the active leg less than 15 NM ahead, the localiser is tuned and you are close to the GPS course. Otherwise use the CDI softkey.
- What does NOT APPROVED FOR GPS mean?
- The GPS may guide you to the approach, but the final course must be flown on a NAV receiver selected on the HSI. You will see it when you load an ILS.
- What does NO GS mean on the PFD?
- A localiser frequency is tuned that has no glideslope, so the text replaces the green diamond beside the altitude tape.
- What does the APR key arm on an ILS?
- LOC and GS together, shown in white in the autopilot status box until each one captures and turns green.
- Does the GA switch keep the autopilot on?
- No. It disconnects the autopilot and leaves the flight director showing a wings-level climb. You hand-fly until you re-engage with the AP key.
See it for yourself
Free and interactive, in your browser. No sign-up, nothing to install.
Sources and further reading
- FAA: Advanced Avionics Handbook (FAA-H-8083-6)
- FAA: Instrument Flying Handbook (FAA-H-8083-15B)
- FAA: Instrument Procedures Handbook
- SKYbrary: Instrument Landing System (ILS)
A teaching aid, not an operating manual: the aircraft's flight manual, the published procedures and your instructor come first.
Unofficial training aid. Not affiliated with or endorsed by Garmin. Not for flight: always follow the approved pilot's guide and your instructor. Garmin and G1000 are trademarks of Garmin Ltd. or its subsidiaries.