See it for yourself
Free and interactive, in your browser. No sign-up, nothing to install.
The layout
Everything is drawn over the attitude background. Working round the screen:
- Top edge: NAV and COM frequencies, with the navigation status box between them showing the active leg, distance and bearing.
- Left: airspeed tape, with true airspeed underneath.
- Right: altitude tape, with selected altitude above, baro setting below and the vertical speed indicator (VSI) beside it.
- Bottom centre: the HSI.
- Bottom edge: air temperature, transponder, time and 12 softkeys.
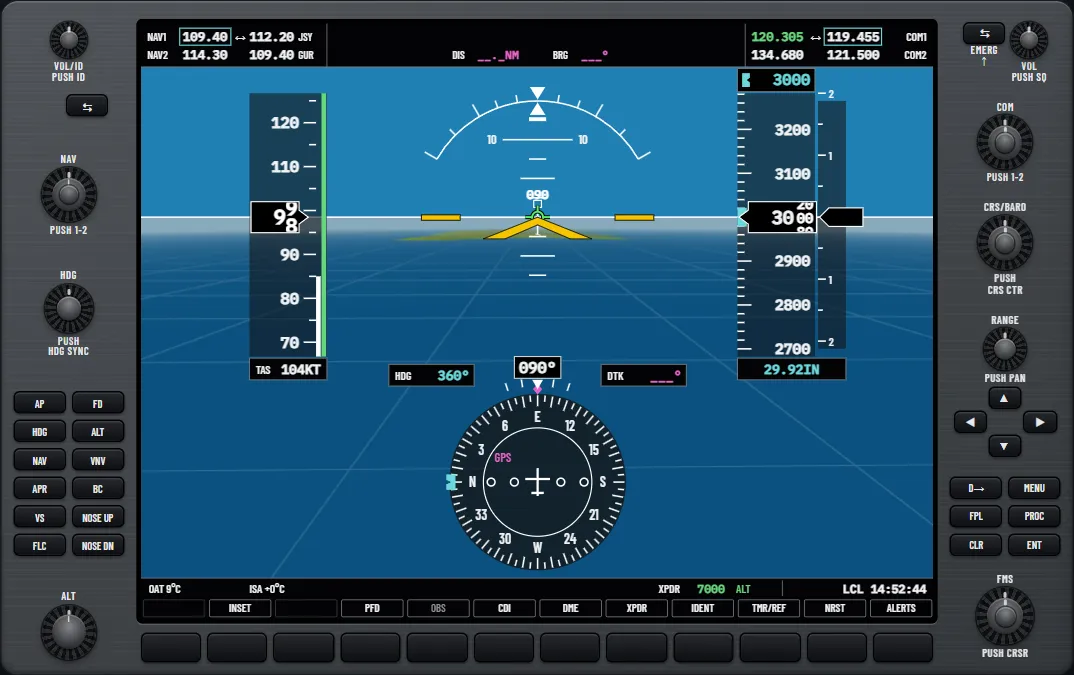
New to the softkeys? See G1000 basics. Coming from round dials? See the glass cockpit transition guide.
Try it: “Reading the PFD”: find each instrument and watch the trend vectors move
Airspeed tape and V-speeds
Indicated airspeed is in the black pointer, with the tape moving behind it. The coloured strip shows the ranges: white for flaps, green for normal, yellow for caution, and red for the never-exceed speed (VNE) and low-speed awareness. The pointer turns red at VNE.
The magenta trend vector beside the strip ends roughly where your speed will be in six seconds at the present rate of change.
Glide, Vr, Vx and Vy can each show as a small lettered flag beside the tape. Press TMR/REF, turn the large FMS knob to a speed, enter it and set its field to ON. An asterisk marks a changed default. This suits best glide, which falls with weight: the Cessna 172S handbook gives 68 kt at 2550 lb and 63 kt at 2200 lb.
Try it: “Vspeed references on the airspeed tape”: set the glide speed and flag it
Attitude
Blue sky over brown ground, with a white horizon line and a yellow aircraft symbol. Read bank from the roll pointer against the arc at the top, where the inverted triangle marks wings level.
The short bar under the roll pointer replaces the ball, and one bar width equals one ball width. In a turn, a bar displaced to the inside is a slip and to the outside is a skid.
Red chevrons pointing back to the horizon appear in extreme attitudes. Beyond 30° nose up, 20° nose down or 65° of bank, the PFD removes extras such as the inset map, baro setting and selected altitude.
Altimeter and baro setting
Altitude is in a black pointer on a moving tape, with its own six-second trend vector at the left. The baro setting is in the box below the tape, set with the large ring of the CRS BARO knob. The trainer starts in inches. To change to hectopascals:
- Press the PFD softkey.
- Press ALT UNIT.
- Press HPA. The box now reads, for example, 1013HPA.
- Press BACK twice to return to the top level.
For standard pressure, press PFD, then STD BARO. In the trainer the knob then starts again from 1013 when you turn back to QNH. Changing the setting also moves any computed vertical path, so make big changes early. Our altimeter settings guide covers when to use which.
Try it: “The altimeter setting in hectopascals”: change units, set QNH, select standard pressure
Vertical speed and selected altitude
The VSI is the narrow fixed scale right of the altitude tape, labelled at 1000 and 2000 fpm. Above 100 fpm the pointer shows the rate in figures.
The selected altitude is in the box above the tape, with a matching bug. Set it with the ALT knob: large ring for thousands, small knob for hundreds. With an autopilot installed, the box also alerts you:
- 1000 ft to go: a tone, and it flashes black on light blue.
- Within 200 ft: it flashes light blue on black.
- Over 200 ft off after reaching it: a tone, and it flashes yellow.
The autopilot guide covers the vertical modes that work with this altitude.
Try it: “Selected altitude and altitude alerting”: watch the box at each stage
The HSI, CDI source and bearing pointers
The HSI is a heading-up compass card. Heading is in the box on top, and the magenta diamond is your track. The HDG knob moves the light-blue bug, and a push syncs it to your heading. The arc above the card shows turn rate: a rate-one turn puts the magenta vector on the outer tick, 18° on. PFD, then HSI FRMT, then ARC HSI swaps the full rose for a 140° arc, and 360 HSI swaps it back.
Try it: “The HSI and the heading bug”: swap the format, move the bug and sync it
The CDI source
The CDI softkey steps the course deviation indicator from GPS to VOR1/LOC1 to VOR2/LOC2 and back. After each press, read the source label beside the aircraft symbol. GPS is magenta, with DTK (desired track) in the box at the upper right. A VOR or localiser is green, with CRS (selected course) there instead. The small CRS knob sets a VOR course, and a push centres the needle.
With an ILS or localiser approach loaded, the CDI can switch to LOC by itself near the final approach fix, once a valid localiser is tuned and you are close to the course. The ILS guide has more.
Try it: “The CDI source and the course”: step through the sources and centre the needle
Bearing pointers and DME
Bearing pointers are extra light-blue needles that never replace the CDI. Press PFD, then BRG1 (single line) or BRG2 (double line). The first press points at a NAV station and the second at the GPS waypoint. The next press removes it, or selects the ADF if one is fitted. A window beside the HSI gives the source and distance, or NO DATA. An ILS frequency removes that pointer, and the arc format hides both. If DME is fitted, the DME softkey on the same level shows its window.
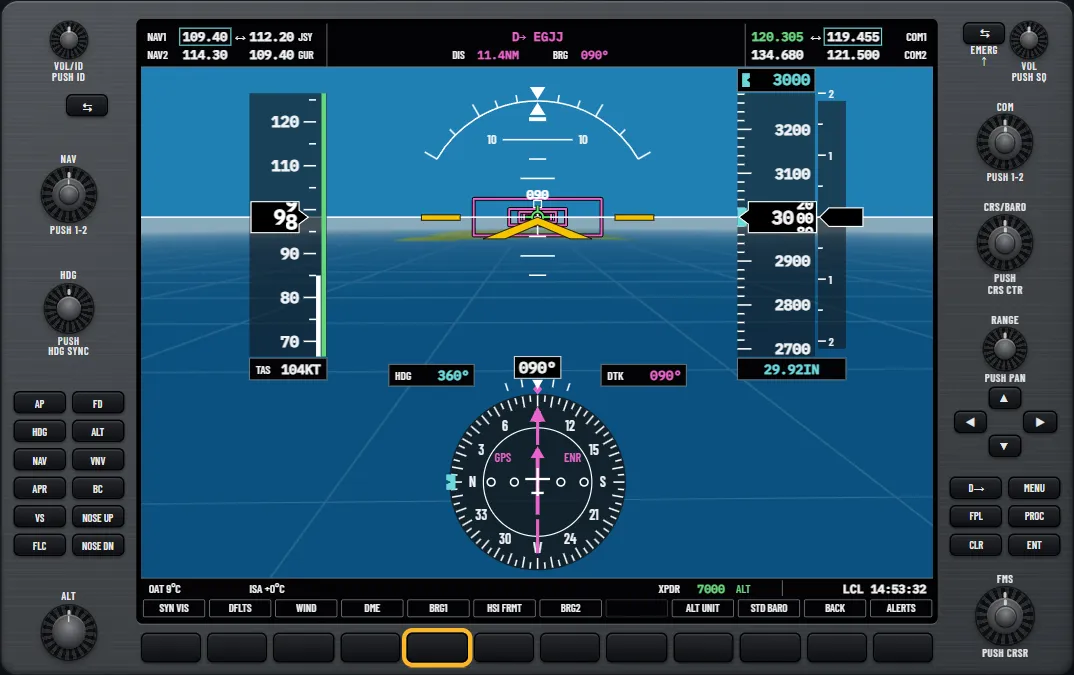
Try it: “Bearing pointers and the DME window”: add both pointers and step their sources
The inset map
The INSET softkey shows a small copy of the navigation map at the lower left, with its own row of keys. DCLTR steps through three levels of declutter, TERRAIN adds terrain and OFF removes the map. Turn the joystick on the PFD to change the range. A traffic advisory brings the inset up by itself.
Try it: “The inset map on the PFD”: show it, declutter it and change the range
Alerts and minimums
A new alert changes the right-hand softkey to ADVISORY, CAUTION or WARNING and flashes it. Press it to acknowledge. An advisory then opens the Alerts window at the lower right. For a caution or warning, press ALERTS again to read the message. Aircraft alerts also show in short form in the annunciation window right of the VSI.
Try it: “The ALERTS softkey and window”: acknowledge a message and read it
To set barometric minimums:
- Press TMR/REF and turn the large FMS knob to the MINIMUMS field.
- Turn the small knob to BARO and press ENT.
- Enter the altitude from your chart and press ENT.
- Press TMR/REF again to close the window.
Within 2500 ft above the setting, a BARO MIN box appears at the lower left of the altitude tape, in light blue, with a bug on the tape. It turns white within 100 ft. At minimums it turns yellow and you hear “Minimums, minimums”. A power cycle clears the setting.
Try it: “Setting the minimums”: enter the ILS 08 decision altitude at Jersey
Questions pilots ask
- What does PFD stand for?
- Primary flight display: the screen that carries attitude, airspeed, altitude, vertical speed and the HSI. The screen beside it is the multi-function display (MFD).
- How far ahead do the magenta trend lines show?
- About six seconds, if the present rate of change carries on. The speed tape, altitude tape and turn rate arc all work this way.
- What is the magenta diamond on the HSI?
- Your current track. The light-blue notch on the rim of the card is the heading bug, which is a different thing.
- Why is the CDI sometimes magenta and sometimes green?
- The colour names the source. Magenta is GPS, and green is a VOR or localiser.
- Which softkeys change the baro setting to hectopascals?
- PFD, then ALT UNIT, then HPA. Press BACK twice to return to the top level of softkeys.
- What does BARO MIN mean?
- It is the box showing the barometric minimums you have set, at the lower left of the altitude tape. It appears once you are within 2500 ft above that altitude.
See it for yourself
Free and interactive, in your browser. No sign-up, nothing to install.
Sources and further reading
- FAA: Advanced Avionics Handbook (FAA-H-8083-6)
- FAA: Instrument Flying Handbook (FAA-H-8083-15B)
- SKYbrary: Glass Cockpit Avionics in Light Aircraft
- SKYbrary: Transition Altitude/Level
A teaching aid, not an operating manual: the aircraft's flight manual, the published procedures and your instructor come first.
Unofficial training aid. Not affiliated with or endorsed by Garmin. Not for flight: always follow the approved pilot's guide and your instructor. Garmin and G1000 are trademarks of Garmin Ltd. or its subsidiaries.